The Local newsletter is your free, daily guide to life in Colorado. For locals, by locals.
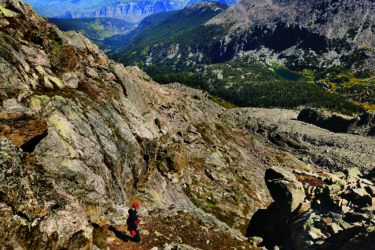
Suzanna Lourie knows Colorado’s high hills better than most. A Silverton-based mountain guide for San Juan Mountain Guides, she’s taken clients backpacking and alpine climbing in the San Juans for more than five years. But when the pandemic kept her from leading people into the backcountry, she spent her time summiting the 13,000-foot peaks within 10 miles of her home. She estimates she’s conquered well over 100. “When driving to fourteeners wasn’t an option,” she says, “I decided to find something closer to home. And there’s no shortage of thirteeners down here.”
But the jump from hiking Colorado’s well-known—and well-used—fourteeners to climbing their shorter siblings was a learning experience, even for the veteran outdoorswoman. “Expect fewer people and less information,” Lourie says, explaining that these peaks have scarcely any legitimate trails, very little signage, and fewer reliable trip reports online. That doesn’t mean beginners shouldn’t start with these peaks, but it does mean some preparation is required. With that in mind, we asked Lourie to help us detail the skills you’ll need to acquire before you set your boots on the trail.
Difficulty: What beta you do find on these hikes is precious, so when someone tells you Coxcomb Peak (the neighbor to Redcliff) is Class 5, you’re going to want to know what that means. Hikers use the Yosemite Decimal System to categorize the difficulty and risk associated with a trail:
- Class 1: This is the trail in your local park. Well-marked and low-risk, these trails are rarely dangerous but still can offer a stiff climb.
- Class 2: Here’s where things start to get steep. On Class 2 paths, be prepared to use your hands for extra balance, but nothing should be particularly dicey when it comes to your safety. Exposure to a fall is limited.
- Class 3: Definitely expect to use your hands on a Class 3 climb. You’ll also want to get yourself in a new headspace: A fall from this kind of terrain could cause broken bones, so take your time and focus. Ropes aren’t necessary—and you’d need to know how to use them effectively—but some hikers might want them to feel more secure.
- Class 4: These routes start to look more like rock climbing than hiking. Ropes are far more common on Class 4 paths as a fall could be deadly. You may want a helmet.
- Class 5: Rock climbing. It’s technical, it’s exposed, and you’ll definitely need ropes and a helmet. When you go to a rock climbing gym, you’ll see routes graded anywhere from 5.1 to 5.10 and up; those numbers increase based on the difficulty of the climb.
Navigation: Siri can’t help you find what you’re looking for up here, folks. You need to know where you’re going—and how to course correct if necessary. “Class 2 can quickly become Class 3, if you don’t,” Lourie says. She recommends knowing how to read and understand a topo map. She also suggests putting in some time at home to find whatever information you can as well as understand the layout of the mountains you’re entering. In other words, a hiker shouldn’t just look at the trail she’s hoping to hike; she should familiarize herself with the entire area. Savvy outdoor recreationists always know which direction the closest highway might be, where drinking water might be found, and where they could go for help. “I think all the times I’ve messed up,” Lourie says, “it’s been because I didn’t really understand the map ahead of time.”
Timing: Peak-bagging is an early-morning pursuit. To avoid afternoon thunderstorms—and the dangerous lightning that comes along with them—you’ll want to be off the summit and any high, exposed ridgelines before early afternoon. It should go without saying, but if you’re still ascending and the weather looks risky, turn around.
Route-finding: Although hikers should look at maps and glean info from trip reports ahead of time, that research shouldn’t be viewed as set-in-stone commandments. “Don’t be glued to your beta,” Lourie says. Being on a mountain is different than reading about being on that mountain. You’ll want to be prepared to consider easier-looking routes, even if they’re not what you expected. You should keep your eyes off your feet so you can take in the terrain and make adjustments using real-world information. Above all, Lourie says, “be prepared to mess up” and be willing to admit when you think you’ve made a mistake. It’s far worse to continue on a path that doesn’t seem right or safe in an attempt to protect your ego. Knowing when you’ve gotten off track, stopping to zoom out, backtracking or making adjustments is simply part of the pursuit.
Scrambling: When you leave the trail and start using your hands and feet to move over loose rock, you’ll officially be scrambling. Especially toward the top of these mountains, where easily markable grass or dirt give way to boulders and scree, don’t expect a trail. Take your time on these tricky surfaces, test each footstep, and be careful not to twist an ankle.
Self-sufficiency: Lourie suggests approaching each hike as if you’re going to be out there alone, which on a thirteener might actually be the case. Knowing some fundamental wilderness skills, like first aid, and carrying the gear you would need in a survival situation (see a list of essentials here) are absolutely key. She also reminds newbies that they should always tell someone where they’re going to be and when they expect to be home so search and rescue can know where to look if a worst-case scenario actually unfolds. Rookies, she says, also need to know that they can’t count on cell service—for anything. Lourie carries a satellite device—there are multiple on the market to choose from—that allows her to call for help in an emergency. The bottom line: “Fewer people equals more risk,” Lourie says, “but also more fun.”