

The Local newsletter is your free, daily guide to life in Colorado. For locals, by locals.
Colorado’s crowded summer trails transform into stretches of pristine wilderness when the snow starts to fall. And these glittering hinterlands are accessible if you own just one piece of gear: snowshoes. Whether you’re happy ambling along a packed-down trail or game for a more strenuous backcountry trek, we’ve got the perfect route for you to explore this winter.
The Crags Trail
Short & (Mostly) Flat

- Near:
- Colorado Springs
- Distance:
- 4.2 miles round trip
- Elevation Gain:
- 800 feet
- Cost:
- Free
- Trekking Poles Needed?
- Yes, in the last quarter of a mile before the summit

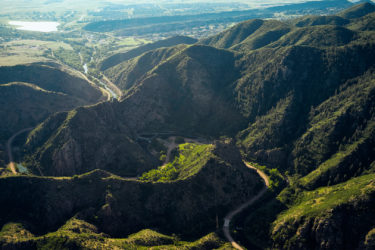
An endless display of white, swirled with spindles of green, lies before me. The snowy vista melts into the peaks of the Rampart Range and then flows seamlessly into the gunmetal sky. This muted color palette makes the three dark blue pools—North Catamount Reservoir, South Catamount Reservoir, and Crystal Creek Reservoir—that interrupt the landscape all the more arresting. I would have snowshoed 10 miles for this, I think to myself.
Fortunately, I only had to clock a little more than two miles to reach these views at the top of the Crags Trail, about 30 miles northwest of Colorado Springs. A popular route for southern Coloradans, most Denverites have probably never heard of this relatively flat, perfect-for-snowshoeing path. Gazing out at the scenery, it feels as if I’ve found a hidden treasure.
Although Colorado’s trails are often lonely in the winter, I shared the riches with a handful of locals as I hiked in. I lost a few of my trailmates when the path split into two separate routes—one toward the Crags and the other toward Devil’s Playground—but I enjoyed the company of those who remained, especially when I lost the trail and found my way back to the powder-covered route thanks only to the sounds of others’ voices.
The snow may have obscured the path to the reservoirs, but it couldn’t hide the area’s red rock formations, first visible from a meadow a mile and a half in, that give the trail its name. They cut a sharp contrast against the sky—some look like globs of red granite poured on top of one another, other jagged pieces jut up like stalagmites.
Just as I started to wonder how much longer I’d need to trek to reach the panorama I’d heard about, the terrain steepened and headed up a ravine. It took a few minutes of quad burning to emerge from the bristlecone pines. But then, there it was: the landscape I would’ve happily worked much harder to see.
Getting There: Take I-25 south from Denver to U.S. 24 west (take the exit toward Manitou Springs). Continue on the highway for about 25 miles; then turn left on Teller County Road 62. You will lose cell service before the turnoff, so keep your eyes open for a dirt road (you’ll want a four-wheel-drive vehicle) marked by a brown sign that reads “Crags C.G. 3 1/2.” The trailhead is three miles in, right before the campground.
Extra Adventure: The three-ish miles of rolling terrain that make up the St. Mary’s Falls Trail climb to the namesake falls, resplendent in their frozen-over state. Bonus: The trailhead is located in Colorado Springs’ North Cheyenne Cañon Park, which features granite rocks that are 1.5 billion years old.
Michigan Ditch Trail
Long & Flat
- Near:
- Fort Collins
- Distance:
- 10 to 13 miles round trip
- Elevation Gain:
- 200 feet
- Cost:
- $4 daily state parks fee for users 16 and older (bring cash)
- Trekking Poles Needed?
- Nope

Not a single cloud dots the sky when I park at the top of Cameron Pass, just east of State Forest State Park. After an hour and a half of 30-mile-per-hour turns through scenic Poudre Canyon, I’m eager to stretch my legs on the long, flat Michigan Ditch Trail. More of a dirt road than a true trail, Michigan Ditch runs alongside a trench that ferries water to the city of Fort Collins. That means utility trucks and other vehicles tamp down any snow that falls here, creating a level layer ideal for an easy snowshoe stroll.
Before crossing CO 14 from the parking area to reach Michigan Ditch, I stop to read informational signs at the Cameron Pass summit. Short blurbs detail the construction of the first highway over the pass, in 1882, and the influx of visitors it triggered, converting previously untrod wilderness into a tourist destination. Michigan Ditch was part of that development. I consider this as I shuffle down the flat road, dug out of a sloping ravine otherwise blanketed in conifer trees. The evergreens, no matter how dense, can’t hide other signs of humans’ legacy here: a large pipe left over from the renovation of the ditch after a 2015 landslide; Lincoln Logs–esque cabins in which Fort Collins water supervisors live during the winter; and the visible erosion of the steep banks rising above the path, caused by the construction of the road.
Then again, it makes sense that people would want to spend time here. The first half of my trip takes nearly twice as long as necessary because I keep stopping to snap photos of the jagged Nokhu Crags and other snow-splattered mountains in the Never Summer range. The high-pitched call of a mountain chickadee echoes as it flies from one fir to another. Snowdrifts create tiny waterfalls that trickle into the canal alongside the trail.
About three miles in, signs offer an alternate route down the American Lakes and Thunder Pass backcountry trails, but I continue to follow the ditch—I’m looking to glide today, not trudge through powder. At the five-mile point, the trail is blocked by the remnants of an avalanche; I take the active chute as a warning to turn around. I’m a little disappointed that I can’t make it to picturesque Lake Agnes as planned, but my spirits lift once I realize that, this time, Mother Nature has won the day.
Getting There: Take I-70 west toward Grand Junction and exit 232 toward U.S. 40 east. After 49 miles, turn right onto CO 125 north; in another 31 miles, turn right onto County Road 27. Go 13.5 miles and then turn right onto CO 14 east, which takes you the remaining 10.8 miles; park at the Cameron Pass summit and cross CO 14 on foot to get to Michigan Ditch Trail.
Extra Adventure: Located on the south side of CO 14, 1.5 miles before you reach the top of Cameron Pass, the two-mile-round-trip Zimmerman Lake Trail starts with a vista of the Elk Mountains’ Diamond Peak and ends with a glimpse of the Neota Flattops, a wilderness area known for its strange-looking ridges flattened by glaciers.
Explorer Essentials: If you’re looking to continue your morning walks in Cheesman Park during the winter, check out Crescent Moon’s new Eva snowshoe. Two inches of foam keep your Nikes off the frozen ground, ensuring your soles aren’t quite as chilly.
The Ridge Trail
Short & Steep
- Near:
- Telluride
- Distance:
- 3.6 miles round trip
- Elevation Gain:
- 1,023 feet
- Cost:
- Free
- Trekking Poles Needed?
- Yes, definitely

When my warm-blooded Texan family visited Telluride in January 2016, they did the things powder virgins do when encountering real snow for the first time: sledding, skiing, and hurling snowballs at one another. But when I suggested Ridge Trail (a path with more than 1,000 feet of elevation gain), everyone demurred—except my brother, an ultrarunner whose idea of a vacation is logging 100 miles around the base of Mt. Rainier.
At the Telluride Adventure Center, where we stopped to ask for directions, the attendant warned us we might want to ride the gondola up to Station St. Sophia and simply hike the descent. She didn’t realize she was talking to highly competitive siblings who would rather lose three toes to frostbite than admit weakness in front of each other. A puny two-mile up-route would be no match for us.
On the trail, though, it quickly became clear we should have heeded her advice. The Ridge Trail goes up, and then up, and then, well, way up. We were soon radiating heat from the effort of climbing the switchbacks—wide cuts that coiled tighter as we climbed closer to the top of 10,500-foot Coonskin Mountain. But the struggle was worth it for the solitude we gained. One minute, there was all the commotion at the base of the mountain. Then the activity ceased, obscured behind the snowy aspens that lined the route. It was like entering the wardrobe and finding a deserted snow globe on the other side.
After the third or fourth switchback, about a mile in, the trees cleared and we could glimpse Mountain Village behind us again. (Tip: You’ll come to a fork in the trail; we recommend sticking to the flatter, less rocky path to the right.) Stopping to allow our heart rates to drop and ogle the idyllic resort, my brother and I used what little air there was to actually chat instead of lobbing our typical taunts. Living in separate states means we rarely spend time alone together, and it was refreshing to talk unabashedly about adult life as we trudged up the slope
After 1.4 miles, the trail turned flatter before ending at Station St. Sophia, where Coonskin Mountain rises between Mountain Village and Telluride. As we gazed at the old mining town, the insults began to flow again. The moment was lost, but that was OK—the Ridge Trail had already delivered what I’d come for. —Spencer Campbell
Getting There: It’s about a six-hour drive from Denver to Telluride. To find the trailhead, start at the Telluride Adventure Center located in Mountain Village. Walk north along Mountain Village Boulevard, passing Lookout Ridge Road on your left. Continue to follow Mountain Village Boulevard as it turns back south behind private residences. When you reach a fork in the road, keep left. The Ridge Trail will be directly ahead of you.
Extra Adventure: For views of diverse landscapes, you can’t beat Telluride’s Lizard Head Trail, which winds 7.6 miles through alpine meadows and spruce, fir, and aspen trees in the Uncompahgre National Forest before climbing up 12,147-foot Black Face Peak. Find the trailhead at the northeast end of the unplowed parking area on the summit of Lizard Head Pass. (Park on the west side of the road.)
Explorer Essentials: The Flipout trekking poles ($70 for the aluminum version; $110 for carbon) from Denver-based Yukon Charlie’s collapse to about a foot long, so they’re easy to store in your pack on the way down Second Creek Trail (a one-mile path to the Broome Hut backcountry cabin on Berthoud Pass). Plus, they come with snow baskets for traction in deep, silky powder.
Burning Bear Trail
Long & (Sometimes) Steep
- Near:
- Georgetown
- Distance:
- 6.5 miles one way (turn around at Ridge Summit 3.7 miles in for an easier trek, or arrange for someone to pick you up at the Hall Valley/Burning Bear West trailhead at the end of the path)
- Elevation Gain:
- 1,170 feet if you start at the Burning Bear East trailhead; 1,183 if you start at Hall Valley
- Cost:
- Free
- Trekking Poles Needed?
- Yes, particularly near the Ridge Summit

I’ve been on Guanella Pass for 10 minutes, and I’m already lost. Or rather, I’m confused about where I’m supposed to go. A friend and I successfully found the parking area for the Abyss Lake and Burning Bear trailheads on a flat portion of Guanella Pass Road. But where Burning Bear Trail might actually be located is a mystery. For a moment, we fear our peaceful morning snowshoe might be over before it ever begins. And then I finally spot it: a tiny sign on the way up to the parking lot, in front of a closed gate.
The barrier opens easily, and a weathered sign announces we’ll reach the Ridge Summit in 3.7 miles and the Hall Valley trailhead in 6.5. After trudging across a boardwalk and then a bridge that crosses still-trickling Geneva Creek, we’re delivered to a wooded wonderland. The layers of snow transform the evergreens into Seussian blobs and mute all sounds save for those coming from the stream, which runs parallel to the gradually ascending trail. Mushrooms and moss poke up where flakes are melting. Fallen trees and broken branches splay into starburst designs alongside the path, leaving as much beauty behind in death as they possessed in life. That’s all before we reach the meadow, about a mile in, where the vistas open up to reveal snow-dipped Geneva Peak and Square Top Mountain. I close my eyes and savor the moment.
The diamond-shaped trail markers become helpful as the path returns to the woods. Soon, we come across a long-abandoned cabin, with partial walls still intact. I marvel, not for the first time, at the effort early settlers must have put into simply surviving life in the Rockies. We haven’t encountered one other person on our multihour trek, probably because many assume Guanella Pass Road is inaccessible during the winter (it’s typically plowed up to Burning Bear Campground on the Grant side and Naylor Lake on the Georgetown side from November to May each year). But the people who once lived in this log house might not have seen other humans for months.
We start to hike up switchbacks after encountering the cabin, and about a mile later we reach the Ridge Summit—the highest spot on the trail, with even more precipitous turns swooping below. Not eager to brave those descending curves, we agree it’s a good turnaround point. The trip back seems like it takes no time at all, as is often the case when you know exactly where you’re going.
Getting There: Follow U.S. 6 west to I-70 west and take exit 260 almost immediately to merge onto CO 470 east. In 5.7 miles, take the exit onto U.S. 285 south. Follow the highway for about 40 miles, until you reach Geneva Road/Guanella Pass Road. Five miles on the mountain pass will get you to the Abyss Lake and Burning Bear parking area. Note that you’ll have to walk back out of the parking lot to spot the sign for the Burning Bear trailhead, in front of a cattle gate on the north side of the road (your right).
Extra Adventure: Climbing a whopping 1,200 feet in just under three miles, the Saints John Trail (which starts off the west side of County Road 5 in the town of Montezuma, about eight miles east of Keystone) is worth the exertion for the dazzling views of Grays and Torreys peaks—both fourteeners—at the end.
Explorer Essentials: Wearing waterproof boots is a given when venturing into the snow-buried backcountry, but pesky ice crystals still find their ways under the tops of our merino wool socks, no matter what footwear we don. Solution: Trek Gaiters ($45) from mountaineering behemoth Rab—whose North American headquarters are in Louisville—ensure the same level of breathable, waterproof protection for our ankles and shins as we have for our (relatively) warm toes.
Shoe Shopping
Although each manufacturer categorizes its snowshoes differently, there are generally four varieties—each designed for a specific type of outdoor wandering.

Trail Walking
If you’re a beginner or heading out on well-maintained trails (like the 1.4-mile round-trip hike to a former gold mine at Snow Mountain Ranch), these entry-level snowshoes with easy-to-buckle bindings are your best bet.

Dayhiking
Once you add elevation gain and rolling terrain to your jaunts, heavier-duty bindings and crampons will help you push through untouched powder on, say, the Waterdog Lakes Trail near Salida—an approximately three-mile route that starts at just higher than 10,300 feet.

Backcountry Exploring
On long, steep hikes like the ones you’ll find on Pearl Pass—which stretches 25 miles from the Ashcroft ghost town to Crested Butte (routes can vary)—snowshoes with a heel lift relieve the strain on your calves and provide more traction on uneven ground.

Snowshoe Running
These ultra-lightweight shoes are ideal for jogging (yes, really) along a hard-packed trail. Snowshoe racers strap these puppies on for events like the Durango Nordic Center’s Winter Warrior 10K on February 10.
Show Me The Way
These guided (or semi-guided) tours let you enjoy your surroundings without having to check the map.
For Foodies
Winter Wine Excursions in Beaver Creek
You wouldn’t expect to ride a chairlift to your snowshoe destination, but the Strawberry Park Express delivers you right to the McCoy Park area and close to 20 miles of groomed trails. Beaver Creek Nordic Center guides will lead you through a 90-minute trek (trails depend on ability level) and drop you off at the Osprey Fireside Grill for charcuterie paired with wine. 11:30 a.m. to 3:30 p.m. Tuesdays, Thursdays, and Sundays through April 5; $200 (includes insulated boots, snowshoes, poles, food, and wine)
For Animal Lovers
Backcountry Snowshoe Hikes in Vail
Those looking for a nature tutorial along with their cardio should sign up for the Walking Mountains Science Center’s half-day trips through the White River National Forest. While you traipse, naturalist Peter Suneson will discuss everything from snow science to how to identify animals—like snowshoe hare, deer, and even mountain lions—by their tracks and scat. 9 a.m. to 1 p.m. Tuesdays and Thursdays through March 29 (weather permitting); $50 (includes snowshoes, poles, transportation to and from the trailhead, and hot beverages)
Anatomy Lesson
Until the 1990s, most snowshoes still resembled tennis rackets, complete with wood frames and rawhide lacing. Today, they look more like garish bear traps. To help us understand the inner workings of this unique piece of equipment, we tapped Jake Thamm, president of Boulder’s Crescent Moon Snowshoes, to walk us through the features of his modern Gold 9 All Terrain Snowshoe.

- Comfortable Bindings: Crescent Moon co-founder and Thamm’s wife, Tamara Laug, is known in the industry for inventing the first bindings that were left- and right-foot specific. Her design uses an over-the-foot loop that’s easily adjustable using one hand and hugs the shape of your foot. The Gold 9 All Terrain Snowshoe also has locking buckles to ensure the straps stay tight.
- Waterproof Straps: The straps on Crescent Moon’s shoes are made of Hypalon, a synthetic rubber material that’s frequently used in white-water rafts. Its waterproof nature ensures it won’t freeze, meaning you’ll be able to adjust your straps in frigid conditions.
- Strong Traction: Any snowshoes you’re taking into the mountains should include metal teeth—called crampons—that dig into the fresh snow so you don’t slip while navigating inclines. Crescent Moon’s include a toe claw at the front tip for extra balance.
- Intuitive Shape: All of Crescent Moon’s frames are shaped like teardrops, a tapered silhouette that allows users to employ a normal gait instead of having to take a wider stance to keep the shoes from bumping into each other.
- Quiet Decking: Many snowshoe companies turn to molded plastics for their decking—the material that stretches across the frame, creating the base of the snowshoe—but Crescent Moon has instead created a proprietary material called TGS, an acronym for “the good stuff.” The blend of synthetic rubber and polyester is strong (it’s tear- and crack-resistant to minus 40 degrees), soft, and most important, quiet. “When you’re out snowshoeing, you ought to be able to listen to the silence of the forest,” Thamm says. “Instead what you hear [with plastic decking] is the sound of what it’s like to walk around on trash can lids.”
By The Numbers: 3.53 Million People who went snowshoeing during the 2015-16 winter season—the lowest number since 2009-10. Industry insiders believe the steady drop over the past several years isn’t due to lack of interest but rather to a lack of snow.
Snow Sprinter
Seventeen-year-old Colorado native and junior world champion snowshoe racer Soleil Gaylord shared her secrets for mastering this obscure sport.

5280: How are trail running and snowshoe racing different?
Soleil Gaylord: I think the main thing that was a shock for me going into a snowshoe race was how much slower it is. You’re going through snow, running up hills; it’s about strength, not speed.
Do you have to change the way you run at all?
You can trip over your snowshoes if you don’t lift your feet high enough. But you need to lift your feet up higher anyway to get through the powder.
How do you train for snowshoe races?
I do a lot of grueling uphill runs with snowshoes on and then tempos on bike paths with running shoes to get cardio fitness as well as strength training.
What are your favorite trails to snowshoe run near where you live?
Near Telluride, I think my favorite trail would be Bear Creek Falls. In the winter, it stays pretty packed down, and it’s got a nice sustained uphill climb—not so crazy that you can’t run it—with a waterfall at the top.
What’s next for you?
I will be attending the world snowshoe championships in Spain on March 3, and I’m going to run track and cross country at Dartmouth next year.
Perspiring Through Powder
Add the resistance of snow to any hourlong stroll, and you’ve got a decent workout. See the data below, compiled by Colorado State University, to see how many calories a 150-pound individual would burn if he or she snowshoed in a variety of frosty environments.
Activity: Walking
Snow Type: Packed
Terrain: Flat
Calories Per Hour: 450
Activity: Walking
Snow Type: Packed
Terrain: Hilly
Calories Per Hour: 515
Activity: Walking
Snow Type: Powder
Terrain: Rolling
Calories Per hour: 700
Activity: Walking with poles
Snow Type: Packed
Terrain: Hilly
Calories Per Hour: 590
Activity: Walking with poles
Snow Type: Powder
Terrain: Hilly
Calories Per Hour: 840
Snowy Summits
Bagging a fourteener has become such a rite of passage for Coloradans that Front Range peaks are clogged with hikers from May to September. Which means locals with a high tolerance for cold weather might want to consider a different pastime: wintertime ascents. But which of the Centennial State’s 14,000-foot mountains are best for a snowshoe summit push? Colorado Mountain Club executive director Scott Robson gives us some recommendations.*
*Robson encourages all intrepid snowshoers to take an avalanche safety course before exploring any backcountry terrain.

Mt. Sherman
Where: Eight miles east of Leadville
Route: Southwest Ridge from Fourmile Creek
Elevation Gain: 3,100 feet
Wintertime Distance: 10.5 miles round trip
Tip: In the winter, County Road 18 (the road you take to get to Mt. Sherman) is usually only plowed up to 11,100 feet, so you’ll have to find a pull-off for your Subaru—instead of snagging a spot in the typical parking area—and trek two and a half miles to the trailhead.
Quandary Peak
Where: 11 miles southwest of Breckenridge
Route: East Ridge
Elevation Gain: 3,450 feet
Wintertime Distance: 6.75 miles round trip
Tip: At the beginning of the trail, you’ll hike through a forest; once you break out into the open, look for a brown marker toward the right side of the slope and head directly up the incline from there. Be forewarned: The summer route, off to the left, is peppered with avalanche terrain.
Mt. Bierstadt
Where: 11 miles south of Georgetown
Route: West Slopes
Elevation Gain: 3,567 feet
Wintertime Distance: About 11 miles round trip
Tip: Guanella Pass is closed at the Naylor Lake intersection on the Georgetown side of the road in the wintertime, so you’ll have to walk about an extra mile and a half to get to the trailhead. When on the hike itself, avoid potential avalanche zones on the north face (the far left side) of the slopes.